homerebeccamaureensuzanneritamomtutorialscontact

Tuesday, February 28, 2012

GoodWill Hunting

OK so we decided to start a new section called "GoodWill Hunting".  We want to share with you the incredible treasures we have found thrifting and antiquing (sometimes even dumpster diving!!)  Most of the time we can take these dumpy old things and make them "new" again.  A couple coats of paint and some finagling with the hubbies, these new pieces become part of our homes!  If you've read Mo's bio she tells you a little bit about this thing we do.  We name where, when and how much.  Its a habit I suspect we picked up from our mother.  With seven kids in the family I think we all learned how to become bargain shoppers and now we HATE to pay full price for anything, especially when you know it will go on sale the second after you buy it!  We've always said "cuanto cuesta?".  Its a Spanish phrase for "How Much is it?"  and we ALWAYS use it.  Actually I think we've shortened it to cuanto.  But you get the drift.  We hope you enjoy our finds and maybe they will inspire you to  start "hunting"!

I'm going to kick start this new post with a few of my most recent favorites.

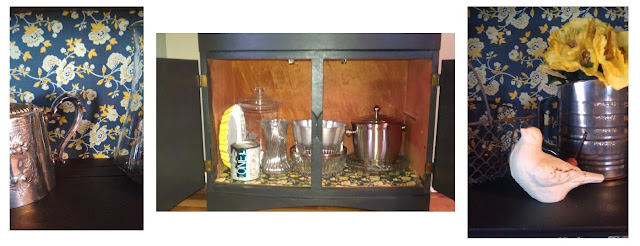
The first piece is this cabinet redo, I found at the Habitat for Humanity ReStore.  The one by me has tons of great finds, while Mo tells me hers is kind off lacking!  So, I usually hit up every couple of weeks to see what new finds they have, and all the money goes to a good cause, so its a win, win! 

What: Ugly Green Cabinet
Where:  Habitat for Humanity ReStore (Jefferson City, MO)
Cuanto: $53.00
We had an small empty wall and I'd been looking for a small cabinet that would fit for months. I spent an afternoon sanding and painting.  I found a great gray, black and yellow shelf liner paper at T.J Maxx for $5.99 that matched my kitchen perfectly.   I added some new knobs from Hobby Lobby  for $1.50 each (I still need to go grab a couple more!) and I love it.  Its so perfect for that little spot.  Here are some more shots.


What: Vintage Aqua Sewing Machine
Where:  Habitat for Humanity ReStore (Jefferson City, MO)
Cuanto: $3.00


For $3.00 I couldn't pass this baby up. I had seen a post on a blog that i of course can't find now with a machine similar to this.  She had it as an accessory in her craft room.  I thought it was so adorable and for 3 bucks, it was TOTALLY worth it.  I haven't done anything with it yet but I will. 

What: Antique Letterpress Drawer
Where:  Applewagon Antique Mall (Mongomery City, Mo)
Cuanto: $11.99


Now, this is not in the best condition but these things can get really expensive.  My mom has been wanting one for a while but couldn't justify spending the cash that people wanted.  I had found one a while back and she was JEALOUS!  So on my way home last weekend I stopped in this antique mall that I pass everytime.  Of course it was getting late and they were closing in 10 minutes, so I had to hurry.  The first thing I saw was this letterpress drawer and I knew it had to be.  For 12 bucks it was a steal, even if it is a little beat up.  I want to make a jewelry holder out of mine like these I've seen on Etsy
bluebirdheaven on etsy


This will give me a few more projects to work on and for only a few bucks!!!!  LOVE GoodWill Hunting!

What are you favorite thrift shops to check out?  What is your latest find??

Thursday, February 9, 2012

Girly Rag Quilt Tutorial

You may remember the post about our cousin's baby shower. Well, what we didn't show you was the gorgeous quilt my mom made for her. It was a baby version so it was smaller but I made basically the same thing.
Isn't it Pretty??

This girly striped rag quilt is perfect for beginners. This was my first time as well and I think it turned out great!! Its really more of a blanket than a quilt but hey, that's what they call it!!  If you can cut & sew in straight lines then this is for you.  I have seen a few on Pinterest and websites that involve squares but, I did stripes for two reasons.  

1.  It was A LOT less work and
2.  I love the striped look.

I decided to make a twin size quilt for one of my boyfriend's daughter's. (Actually have to make one more but I'm taking a day off!) 
This quilt took a few hours, but I think it was so worth it and fun! I can't wait to show it to the girls.

I used flannel  for both the front and back and Warm & Natural batting for the center.  Jo-Ann Fabrics had flannel on sale this week for $2.50/yard and Warm & Natural for $6.99/yard. And I had a 20% off coupon.  Total cost was about $30 for one.  Don't you love sales!?
Supplies:
      -5 coordinating fabrics in flannel, 2 yards each
      -2 Yards of Warm & natural (you can use flannel if you want it to be lighter and cheaper!)
      -Spool of Thread ( I used white)
      -Sewing Machine
      -Rotary Cutter
      -Self-Healing cutting mat (or sharp scissors
        & your floor!)
      -See-through or quilting ruler
      -Sharp embroidery scissors


Here are a few things I noticed that may make it easier for some. 

1.  Flannel at Jo-Ann is 42" wide (44"wide at Hobby Lobby), this was the perfect width for my quilt. 

2.  If you don't have a rotary cutter and a mat, GET ONE.  Don't just get one, get a nice one.  Mine is a cheap-y and it hurt my thumb after an hour of cutting. 

3.  Some people use flannel as batting.  I wanted a thicker quilt so I used Warm & Natural.

4.  Straight lines at the beginning make the end SOOO much easier!

Here are standard sizes for twin / crib / toddler quilts.

  • Crib 36” x 54”. 45” x 60” is large enough for a “toddler” bed.
  • Twin 65” x 88”

  • I made mine 71" x 85" mostly because I wanted it to be as easy as possible and didn't want to cut more than I needed to.

    Here we go!!


    1. Double fold your fabric so that there are two layers.
    2. Cut 2 strips of each fabric @ 8" wide (will be 72" when opened)
    3. Cut 2 strips of each fabric @ 6" wide
    4. Cut 2 strips of each fabric @ 4" wide
    5. Cut 2 strips of each fabric @ 3" wide


    6. Fold your batting so that it is double folded also.
    7. Cut 5 strips of batting @ 7" wide (will be 71" when opened) 
    8. Cut 5 strips of batting @ 5" wide
    9. Cut 5 strips of batting @ 3" wide
    10.Cut 5 strips of batting @ 2" wide


    11. Layer the matching strip in this order: face down, batting, face up.  Make sure there is a 1/2' inseam all around.  This would be the perfect time to place a few pins in this to hold it in place.  I however couldn't find mine so I just stacked them on top of each other. 


    12. Sew a straight line down the middle of each strip.


    13.  Be sure to double stitch the beginning and end of the strip with the reverse to add durability.


    14.  Now do this 19 more times!

    15.  At this point you should have all your pieces and now its time to put it all together.  I laid mine out to see how I wanted my pattern to go.  You can do it randomly or a set pattern.  I did it randomly.


    HINT:
    I "cheated" and taped some ribbon down at the 1/2" mark as a guide so it was easier for me to see!  It worked really well!


    16. Start Sewing them together.
    Always sew with the right (smooth) side of the quilt up. 


    I found my pins!!! 


    17.  I made three separate "panels" so that it wasn't so heavy while I was sewing.  I sewed these together after they were all done.

    18.  Now at this point I had a raggedy looking edge on one side with uneven stripes, so I trimmed it up so it was all even. 

    19.  Go around the entire quilt with a 1/2" border around it.


    20.  Now grab yourself a glass of wine (or two!) and plop down on the couch, because this part kind of sucks.  OK, not really, but it seems much worse than it actually is.  Snip the edges of every stripe and the border. It took me probably 2 hours to do this but I was kind of stopping and starting again. 

    My mom, who is much more talented than I, hand binded her quilt.  I was not about to do that!  But, if you want to, just don't snip the outside edge and bind it. 


    21.  FINALLY, throw it in the wash.  Use cold water and while drying be sure to check your lint trap periodically.  It is sure to get full!


    Now...I have to make one more just like it!!


    Wednesday, February 8, 2012

    LOVE-ly Valentine's Day DIY's

    Valentine's is only 6 days away!!  I of course have a ton of things I have told myself I am doing, but have yet to do any of them!  I have found a lot of inspiration on Pinterest and there are almost too many to pick from. 

    For the kiddos's there are tons of DIY valentine's printables that are super cute and simple!

    Here are some examples from Jen at Pizzazzerie.com!  She has all files in one file, ready to be printed!  What could be easier than that?

    
    BEE Mine Pillow Boxes http://tinyurl.com/6rtlmt6
    
     Burt's BEE(s) Mine http://tinyurl.com/6rtlmt6
    
    Valentine's Printable Pictures  http://tinyurl.com/8943vlx
    
    Dino-Mite bag toppers http://tinyurl.com/6rtlmt6


    Print Candee is one of my new favorite sites.  Not only do they have crazy cute printables for very affordable prices, they also give out tons of freebies.  right now if you "like" their Facebook page you get this adorable little mailbox template.  http://www.facebook.com/printcandee

    Wouldn't this be perfect for a little girls card holder at school?!
      
    Here are some Valentine printables from Etsy that are all super quick, easy and UNDER $5.00!
    
    
    $5.00 "LOVE" banner printable by partypapers 
    http://tinyurl.com/6ssn9gu

    
    $3.00 "LOVE" Mini Cake Bunting Printable by ItsyBelle
    http://tinyurl.com/77cdg5g
    $5.00 Swedish Fish  Printable Valentine's by PBJandJ
    http://tinyurl.com/73tv9ch


    $5.00 Kisses Stickers by digitalartstar
    http://tinyurl.com/7zum6ts


    I hope these add a little touch of "handmade" to your V-day this year!  I'll be posting about some DIY mens gifts that are sure to please.  Enjoy!

    Monday, February 6, 2012

    Better Than Christmas

    
    Photo By David Phillip
    http://tiny.cc/n4mo8
    Yesterday the New York Giants defeated the New England Patriots in the Super Bowl, beating the Patriots 21-17.  To a lot of people this is the day that they wait for all year.  Whether its for the game, the food, or the commercials, people gather all around the country to celebrate this truely American sport. 

    TODAY is the day that I wait for all year.  It means the end of football (for a while at least!).  In my house football is like religion.  Its what we do on Sundays.  And Mondays.  And Thursdays.  I'm not one of those girls who enjoys sports, I can't even pretend to be interested. I really don't even know how my boyfriend Heath and I even work because we are SOOOO different. My idea of a good time at a football game involves tailgaiting with large amounts of alcohol and lots food that I don't have to make.  His probably involves anywhere that I'm not! 

    So today is my favorite day of the year.  I'll sing from the rooftops I am so happy!!!
    I will admit that yesterday started out a little shakey, running around getting the house and food ready for company, but it ended up being kind of nice.  Good company and food can cheer anyone up, even grumpy old me (Just ask Heath, he'll vouch for the grumpy part!).  My favorite thing yesterday was a Spinach Artichoke Dip that I made on the fly and I must say, it turned out amazing! So here is my recipe.  I hope you all enjoy it as much as I did!

    1 large Jar of artichoke hearts, chopped into bite sized pieces
    1 block of frozen spinach, thawed
    1 1/2 Cup of grated parmesan cheese
    1/2 Cup of mozarella shredded cheese
    1 block of cream cheese
    1 Cup of Sour Cream

    Mix all the ingredients in a small crock pot and set on low for an hour before serving.  Mix occasionaly until it is all melted. 

    I also subbed some of these ingredients for a slightly lighter version. 
    -Lowfat shredded cheese
    -Neufchâtel cheese instead of cream cheese
    -Fat Free Sour Cream

    I hope everyone else has as great a Monday as I am!  Now we have 7 full months until it starts again!

    You Might Also Like

    Related Posts Plugin for WordPress, Blogger...